
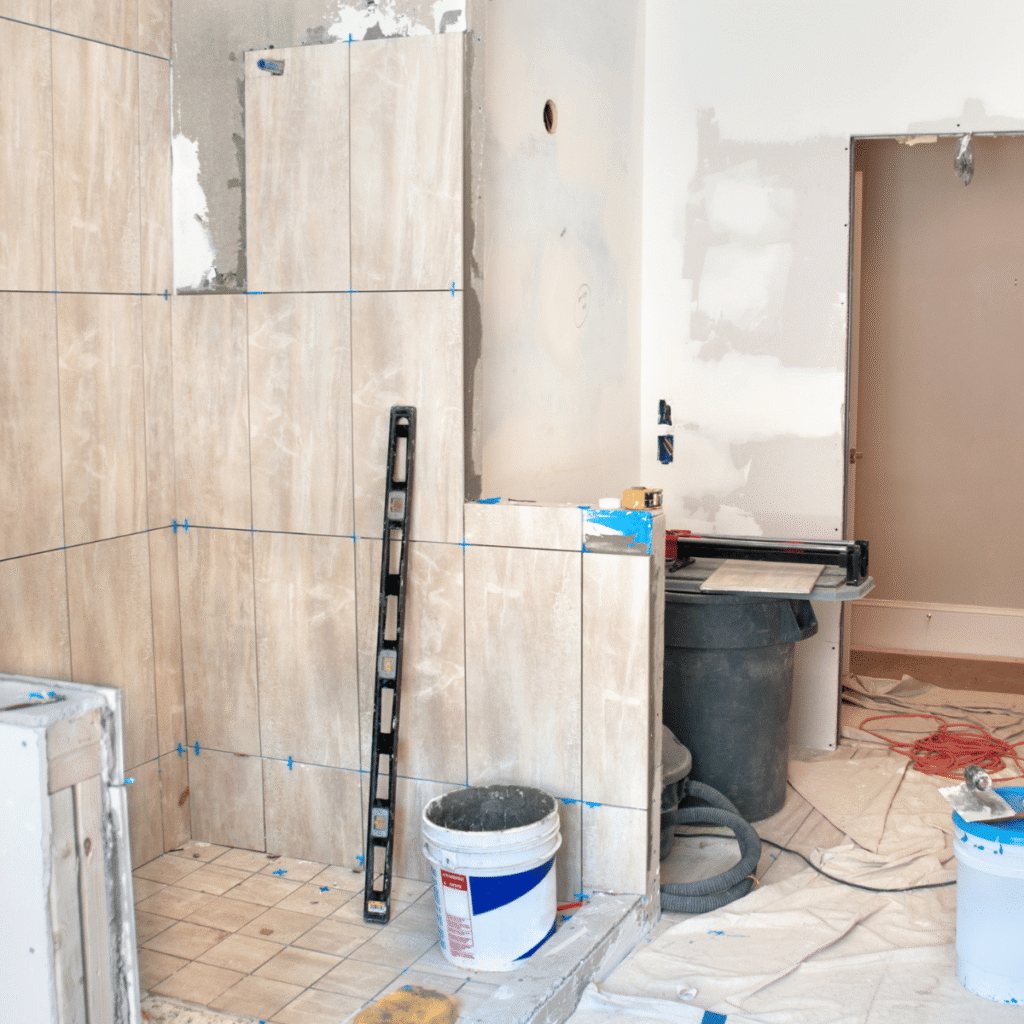
When planning a bathroom remodel, homeowners often spend most of their time choosing tile colors, finishes, and sizes. Those decisions matter, but the way the tile is installed can have just as much impact on the finished bathroom.
One layout we frequently recommend for rectangular and large-format bathroom tile is the 1/3 offset tile pattern. It creates a clean, balanced appearance while helping reduce uneven tile edges that can occur with a traditional brick-style layout.
For homeowners considering bathroom remodeling in Castle Rock, Parker, Highlands Ranch, Castle Pines, or elsewhere in Douglas County, understanding this pattern can help you make a more informed tile-selection decision.
What Is a 1/3 Offset Tile Pattern?
A 1/3 offset pattern is a staggered tile layout in which each row begins approximately one-third of a tile’s length away from the row beneath it.
For example, with a 12-by-24-inch tile:
- The first row may begin with a full tile.
- The second row begins approximately 8 inches into the pattern.
- The third row begins approximately 16 inches into the pattern.
- The sequence then repeats.
This creates a gradual, stair-step appearance rather than positioning every tile directly above another tile or centering each tile at the halfway point.
The pattern is sometimes called:
- One-third offset
- 33% offset
- Third-stagger tile pattern
- Running bond with a one-third offset
How Is It Different From a 50% Offset?
A traditional 50% offset places the end of each tile directly beneath the center of the tile above it. This is the familiar brick pattern commonly seen with subway tile.
That arrangement works well with many smaller tiles. However, it can create problems with longer rectangular tiles because manufactured tiles are not always perfectly flat.
Many large-format rectangular tiles have a slight curvature or bow through the center. With a 50% offset, the highest point of one tile may sit next to the lower end of another tile. That can make the edge of one tile appear higher than its neighbor.
This unevenness is known as tile lippage.
A 1/3 offset changes where the high and low areas meet, helping the installer create a flatter and more consistent finished surface. The original source article likewise identifies reduced lippage as one of the main functional reasons for using a one-third offset with longer rectangular tile.
Why the 1/3 Offset Works Well in Bathrooms
The 1/3 offset pattern is popular because it combines practical installation benefits with a polished design.
It can reduce visible lippage
Reducing lippage is especially important in showers and bathroom floors, where uneven edges can affect both appearance and comfort.
Proper installation still requires:
- A flat and properly prepared surface
- Consistent mortar coverage
- Appropriate grout-joint spacing
- Tile-leveling techniques where needed
- Careful waterproofing in wet areas
The pattern does not replace skilled installation, but it can make certain large-format tile installations more forgiving.
It creates visual movement
The staggered grout joints guide the eye across the wall or floor. This gives the bathroom subtle movement without making the room feel overly busy.
It works particularly well in bathrooms where the homeowner wants something more visually interesting than a straight-stack pattern but less traditional than a centered brick layout.
It complements large-format tile
Large-format porcelain tile is a popular choice for shower walls and bathroom floors because it can create a more continuous appearance with fewer grout lines.
The 1/3 offset pattern is particularly well suited to longer rectangular tile and wood-look plank tile. The referenced article notes that manufacturers commonly recommend this type of layout for longer tile formats to help manage potential curvature and improve visual flow.
It can help a bathroom feel larger
The direction of the tile can influence how the room feels.
Horizontal rectangular tile can make a narrow wall appear wider. Vertically installed tile can draw the eye upward and make a shower feel taller.
The staggered pattern adds movement while maintaining the cleaner appearance homeowners often want from larger tile.
Where Can You Use a 1/3 Offset Pattern?
This layout can work in several areas of a bathroom remodel.
Shower walls
A one-third offset is an excellent option for 12-by-24-inch shower tile and other elongated rectangular formats.
It creates a refined appearance while helping the installer avoid aligning the center of one tile with the end of another.
Bathroom floors
The pattern can be used with porcelain planks, stone-look tile, and longer rectangular floor tile.
For floors, the flatness of the substrate is especially important. Even the right pattern cannot compensate for an improperly prepared floor.
Tub surrounds
A staggered layout can add dimension to a tub surround without overwhelming the room.
It also works well when the same tile is carried from the tub surround into another part of the bathroom.
Feature walls
The 1/3 offset can be used behind a vanity, around a freestanding tub, or on a bathroom accent wall.
Contrasting grout will emphasize the pattern, while matching grout will produce a quieter and more unified appearance.
What Tile Sizes Work Best?
The pattern is most commonly used with rectangular tile, including:
- 4-by-12-inch tile
- 6-by-18-inch tile
- 8-by-24-inch tile
- 12-by-24-inch tile
- Wood-look porcelain planks
- Long-format subway tile
It can also be used with smaller rectangular tile when the goal is purely aesthetic.
For smaller tile, the risk of bowing and lippage may be lower, so the pattern choice is often based more on the desired appearance.
Should You Use a 1/3 Offset, Straight Stack, or Herringbone?
The best layout depends on the bathroom, tile, and overall design.
Choose a 1/3 offset when:
- You are using longer rectangular tile.
- You want subtle movement.
- You prefer a transitional or contemporary appearance.
- The tile manufacturer recommends a maximum offset.
- You want to reduce the visual impact of potential tile curvature.
Choose a straight-stack pattern when:
- You want a clean, modern, or minimalist bathroom.
- You want the grout lines to form a precise grid.
- The tile is highly consistent in size and shape.
- You are using a bold tile and want a quieter layout.
Choose herringbone when:
- You want the tilework to become a focal point.
- The bathroom needs more visual texture.
- You are highlighting a shower niche or accent wall.
- The added labor and material cuts fit the remodeling budget.
Hexagons, mosaics, basketweave patterns, and specialty shapes are other options when the homeowner wants a more decorative result. Tile shape, grout color, layout, and scale all influence whether a bathroom feels understated or dramatic.
Grout Color Makes a Difference
The grout color can significantly change how noticeable the offset pattern becomes.
Matching grout
Using grout close to the tile color softens the individual joints and creates a more seamless appearance.
This is often a good choice for:
- Small bathrooms
- Spa-like designs
- Marble-look porcelain
- Minimalist bathrooms
- Large-format shower walls
Contrasting grout
A darker or lighter grout emphasizes the tile shape and staggered pattern.
This can work well when the tile layout is intended to be part of the bathroom’s design rather than simply a background surface.
Keep in mind that highly contrasting grout can make small alignment inconsistencies more visible, so precise installation becomes even more important.
Tile Layout Should Be Planned Before Installation
A professional tile installation should not begin by simply placing a full tile in one corner and continuing across the wall.
The installer should first evaluate:
- Where cut tiles will fall
- Whether narrow slivers can be avoided
- How grout lines align with niches, windows, benches, and fixtures
- Where the pattern should begin
- Whether the tile has visible bowing
- The manufacturer’s offset recommendation
- How the pattern continues through corners
This planning stage is especially important in showers, where waterproofing, plumbing penetrations, niches, benches, and glass enclosures all affect the layout.
Professional Bathroom Tile Installation in Douglas County
The right tile pattern can make a bathroom look more refined, but the pattern is only one part of a successful installation. Surface preparation, waterproofing, layout, cutting, setting, grouting, and finishing all contribute to how the bathroom performs over time.
Enhance Bath Remodel & Handyman Services provides bathroom remodeling, shower conversions, tile installation, waterproofing, vanity upgrades, and related services throughout Castle Rock and Douglas County. The company emphasizes written estimates, dependable scheduling, employed craftspeople rather than subcontracted crews, jobsite cleanup, and locally delivered service.
Whether you are updating a builder-grade bathroom, replacing an outdated shower, or completing a full bathroom remodel, our team can help you choose a tile size and layout that fits the room and performs properly.
Ready to Plan Your Bathroom Remodel?
Enhance Bath Remodel & Handyman Services serves homeowners throughout:
- Castle Rock
- Castle Pines
- Parker
- Highlands Ranch
- Sterling Ranch
- Roxborough Park
- Larkspur
- Sedalia
- Franktown
- Surrounding Douglas County communities
Request a free estimate to discuss your shower, tile installation, tub-to-shower conversion, or complete bathroom remodeling project.
Call 720-571-7890 or request a free estimate online.
Get Started on Your Bathroom Remodel Project
Frequently Asked Questions
Do you offer free estimates for bathroom remodeling and handyman projects?
Yes. Enhance Bath Remodel & Handyman Services, Inc. offers free estimates for bathroom remodeling and handyman projects in Castle Rock, Douglas County, and surrounding Colorado communities.
What areas do you serve?
Enhance serves Castle Rock, Douglas County, Castle Pines, Highlands Ranch, Parker, Sterling Ranch, Larkspur, Lone Tree, Sedalia, Roxborough Park, and nearby Colorado communities.
What types of bathroom remodeling projects do you handle?
Enhance handles bathroom remodeling projects such as shower updates, tile work, vanity upgrades, fixture installation, drywall repair, caulking, and other bathroom improvement projects.
Do you also provide handyman services?
Yes. In addition to bathroom remodeling, Enhance provides handyman services including drywall repair, tiling, door repair, door replacement, light fixture installation, plumbing fixture installation, trim carpentry, picture and mirror hanging, and grab bar installation.
How do I request an estimate?
You can request an estimate by visiting the free estimate page, using the website contact options, or calling Enhance Bath Remodel & Handyman Services, Inc.